How to get the most out of EZ360 and organize professional VR demos
If you want to make a professional impression when showcasing your VR content to your audience using VR headsets, looking into EZ360 should be the first thing to do. However, after you have decided to make use of EZ360, it could be useful to also apply the things from below to bring your VR demos to the highest level!
No more controller needed
Firstly, the most important thing to know about and to adjust when you use EZ360 (with Oculus Go, the most popular headset at the moment) has to do with the controller. From your EZ360 account settings you can already make a lot of adjustments to make the VR player behave like you want, however it is not possible to make changes to some core functionalities built in by Oculus. Luckily, you can adjust the oculus settings yourself to make your Oculus headset work as best as possible with the VR player. This way, you can get rid of the annoying “Enter VR” screen that often pops-up before you enter the VR experience. And you can even take it a step further by enabling developer mode for your VR devices, which allows you to easily skip this annoying screen without the need of a controller.
Offline playback and manual file transfer
For EZ360 there is no need to have an internet connection in order to play the VR content. It is only required to allow the VR headsets to download the latest content that you prepared in your EZ360 account, which you can do before you organize the VR demo. The VR content will always be locally stored on your VR devices, so EZ360 can always play the content that has been downloaded to the device. But what if you do not even have a (good) internet connection to upload or download your content to and from the EZ360 servers to your VR devices? Don’t worry, you can still manually transfer your content to the VR devices using USB, EZ360 will recognize the content and still be able to play it.
End the experience however you like
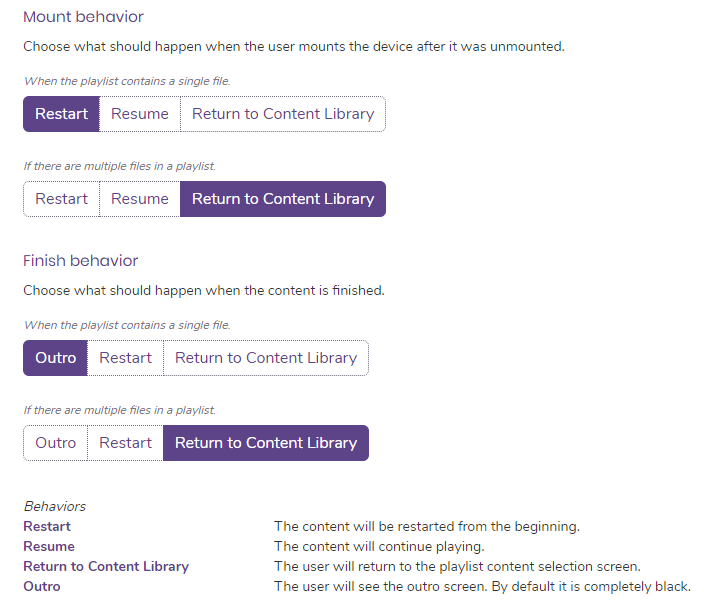
After you have installed the EZ360 app on your VR device and connected it to your account, make sure to also take a look at the EZ360 settings. Here you have the ability to, amongst other things, adjust the mount behaviors of the VR content. For some occasions, you might want a video to loop and for others you maybe want the screen to go to black to indicate it has ended. Whether it is looping, going to black or sending them back to the video selection screen, you can adjust your preferences with EZ360 easily!
Custom branding
One thing that you should definitely do is remove the default EZ360 logo and replace it with your own, if you use multiple videos. If it is just one video, the video will play directly, without the video selection menu to appear. Also, you can replace the default 360-degree background with one of your own, to match it with your branding or theme.
VR Sync
Finally, to make use of another very useful built-in feature of EZ360, VR Sync is also something that you should definitely apply. This functionality allows you to organize synchronized Virtual Reality viewings where you can remotely start the VR content for several VR headsets at the same time!
Thanks for checking out this article. Hopefully, these tips will help you to bring your VR demos to the next level!
If you’re new to us, definitely make sure to checkout EZ360, our software has helped out many organizations with their VR content. If you have questions regarding this article, please don’t hesitate to contact us. We are happy to help!
